WordPress allows you to create your own custom content types. These content types are called custom post types. You can use them to add custom content like products, reviews, recipes, etc. In this article, we will share the 12 most useful WordPress custom post types tutorials.
1. When Do You Need A Custom Post Type
Before you start creating custom post types or taxonomies on your WordPress site, it’s important to evaluate your needs. A lot of times you can achieve the same results with the default WordPress posts and pages.
With the help of built-in categories and tags, you can sort your content in many different ways. With pages you can set up a hierarchical layout of content with parent-child relationship.
If you are unclear, then refer to this guide about when do you need a custom post type or taxonomy in WordPress.
2. Adding Icon for Custom Post Types
When you create a custom post type, WordPress uses the default post icon if no icon is provided. You can add your own icons to custom post types. These icons are displayed in your WordPress admin bar.
WordPress uses font icons in the admin area to ensure they look beautiful on all devices and screen sizes. The easiest way to add a font icon to your custom post type is by using the CPT Custom Icon plugin. Simply install and activate the plugin and visit the plugin’s settings page to add an icon.
Another method is to add the icon while you are creating your Custom Post Type with CPT UI plugin.
For more detailed instructions, see this tutorial on how to add icons for custom post types in WordPress.
3. Creating a Custom Post Types Archive Page
Adding custom post types in WordPress has become very easy thanks to the CPT UI plugin. However, many beginners have trouble displaying their custom post types on their websites.
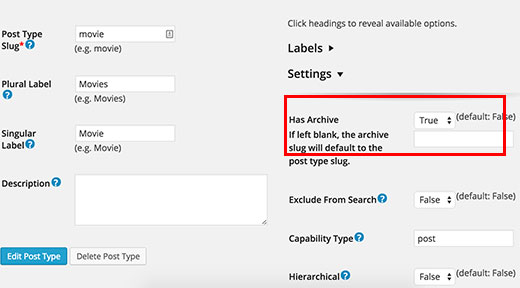
To add custom post type archive page, first you need to make sure that archives are enabled for your custom post type. In most cases, they are but if not then you will need to enable them. CPT UI plugin has a checkbox under advanced options to enable archives.
Now if you are using pretty permalinks, then you can access custom post type archives page by visiting a URL like this:
http://www.example.com/products/
Replace example.com with your own domain name and products with your custom post type name. If you cannot see your custom post type, then visit Settings » Permalinks and click on the save changes button. This will update your permalink structure, and you should now be able to see your custom post type archive page.
For more detailed instructions, check out this guide on custom post types archives page.
You can also add a menu item to your custom post type in navigation menus. Simply go to Appearance » Menus and click on the ‘Custom Link’ tab. Next, add your custom post type name and URL.
4. RSS Feeds for Custom Post Types
WordPress comes with a built-in RSS generator for all content types, taxonomies, authors, and date based archives. It uses a proper URL structure that queries the database and generates the RSS feed you want to see.
For example, to see the RSS feed of your custom post type ‘movies’ you will add this URL:
http://www.example.com/feed/?post_type=movies
For more details, see how to make separate RSS feed for custom post types in WordPress.
5. Adding Custom Post Types to Your Main RSS Feed
By default, WordPress only includes your blog posts in your site’s main RSS feed. This means that your custom post type content is not visible to your main RSS feed subscribers.
You can easily include your custom post types into your main RSS feed by adding the following code to your theme’s functions.php file or a site-specific WordPress plugin.
function myfeed_request($qv) {
	if (isset($qv['feed']) && !isset($qv['post_type']))
		$qv['post_type'] = array('post', 'books', 'movies');
	return $qv;
}
add_filter('request', 'myfeed_request');
Replace books and movies with your own custom post types.
Learn more about how to add custom post types to main WordPress RSS feed.
6. Search Form for Custom Post Types
The default WordPress search feature is very limited. Specially if you are using custom post types on your WordPress site. You can add a custom Google Search form to your WordPress site, but even that form doesn’t allow users to select search parameters.
Another solution is to use a plugin like SearchWP which allows you to create advanced search forms and is capable of searching through all custom post types, taxonomies, and custom fields.
If you would rather prefer to build your own custom search form, then here is what you need to do. First add your custom post types hidden fields in the search form by adding this code in searchform.php file of your child theme.
<input type="hidden" name="post_type[]" value="articles" />
<input type="hidden" name="post_type[]" value="post" />
<input type="hidden" name="post_type[]" value="videos" />
<input type="hidden" name="post_type[]" value="books" />
This code simply adds hidden fields for your custom post types, replace value with your own custom post types. The next step is to tell WordPress what to do with these fields. Add this code before the loop in your theme’s search.php file:
<form role="search" method="get" id="searchform" action="<?php echo home_url( '/' ); ?>">
<input type="text" name="s" id="s" <?php if(is_search()) { ?>value="<?php the_search_query(); ?>" <?php } else { ?>value="Enter keywords …" onfocus="if(this.value==this.defaultValue)this.value='';" onblur="if(this.value=='')this.value=this.defaultValue;"<?php } ?> /><br />
<?php $query_types = get_query_var('post_type'); ?>
<input type="checkbox" name="post_type[]" value="articles" <?php if (in_array('articles', $query_types)) { echo 'checked="checked"'; } ?> /><label>Articles</label>
<input type="checkbox" name="post_type[]" value="post" <?php if (in_array('post', $query_types)) { echo 'checked="checked"'; } ?> /><label>Blog</label>
<input type="checkbox" name="post_type[]" value="books" <?php if (in_array('books', $query_types)) { echo 'checked="checked"'; } ?> /><label>Books</label>
<input type="checkbox" name="post_type[]" value="videos" <?php if (in_array('videos', $query_types)) { echo 'checked="checked"'; } ?> /><label>Videos</label>
<input type="submit" id="searchsubmit" value="Search" />
</form>
7. Adding Sticky Posts for Custom Post Types
Sticky posts is a feature in WordPress which allows you to add featured posts. By default it only works for blog posts.
You can enable it for your custom post types as well by installing and activating the Sticky Custom Post Types plugin. Upon activation, go to Settings » Reading and scroll down to the section Sticky Custom Post Types.
Next, you need to choose the custom post types where you want Stick This option to be enabled.
For more details see this tutorial on how to add sticky posts for custom post types in WordPress.
8. Disable Disqus on Custom Post Types
If you are using Disqus commenting system in WordPress, then you will notice that your Disqus comment box will start appearing on all your custom post types. If you do not want users to comment on these custom post types, then you will need to manually disable Disqus for selective post types. Simply add this code snippet into your theme’s functions.php file or a site-specific plugin.
add_filter( 'comments_template' , 'wpb_block_disqus', 1 );
function wpb_block_disqus($file) {
if ( 'custom_post_type_name' == get_post_type() )
remove_filter('comments_template', 'dsq_comments_template');
return $file;

}
Don’t forget to replace custom_post_type_name with your own custom post type name. For more detailed instructions see our guide on how to disable Disqus on custom post types in WordPress.
9. Adding User Submitted Content in Custom Post Types
Sometimes you may want to allow users to submit content for custom post types on your site. For example, movie reviews, recipes, etc.
One way to do this is by giving users access to your WordPress admin area and assigning them author user role. But if you don’t want that, then there is another way.
You will need Gravity Forms plugin for that. It enables you to add a public content submission form that your website visitors can use.
After installing Gravity Forms, you will need to install and activate Gravity Forms + Custom Post Types plugin as well.
Now create a new form, and you will notice that there will be an option to map each field to your custom post types. For more detailed instructions see our tutorial on how to add user submitted content for custom post types in WordPress.
10. Switch or Convert Custom Post Types
You may come across situations where you will have to merge or convert custom post types. You may also want to move items from one post type to another.
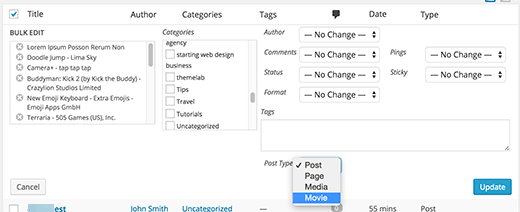
Simply install and activate the Post Type Switcher plugin. Upon activation, go to Posts » All Posts. If it is a custom post type, then go to the screen that shows all items in that post type.
Select the items or posts that you want to move, then click on quick edit link. You will notice a new drop down menu allowing you to change post type for that item.
For more detailed instructions see our tutorial on how to switch or convert custom post types in WordPress.
11. Using Custom Post Types as Taxonomies
Yes, you read that correctly, and you are probably thinking why use CPTs as taxonomies? Why not just create custom taxonomies? Let’s say that you have a custom post type for books and another custom post type for authors. Now you may want to associate authors with the books they have written. You can create a custom taxonomy for authors, but then you will have an authors taxonomy and a post type which only adds to the confusion.
Simply install and activate the CPT-onomies plugin. It allows you to build relationships between post types by using custom post types as taxonomy.
Using this plugin, the next time you add a book you can select the author as CPT-onomy and show all the books written by that author. Learn more about using custom post types as taxonomies.
12. Custom Meta Boxes for Post Types
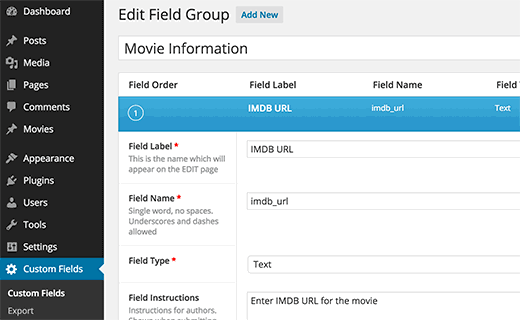
Custom meta boxes allow you to add custom fields into WordPress post editor screen. This way you can create additional input fields for your post types. The easiest way to create custom meta fields in WordPress is by using the Advanced Custom Fields plugin.
After installing the plugin, simply click on Custom Fields in WordPress admin bar and then click on Add New. Follow on screen instructions to create a group of custom fields you want to add to your custom post type.
 This is how the custom fields panel will appear on the post edit screen for your post type:
You can display data entered into your custom fields by modifying your theme templates. For example, we would use
<?php the_field('imdb_url'); ?>
template tag to display IMDB URL custom field.
You can also use shortcode like
[acf field="{$imdb_url}"]
in your post types to display custom field data.
That’s all we hope this article helped you learn some cool tricks for custom post types in WordPress. You may also want to take a look at these best category hacks and plugins for WordPress.


