1. How to use a Custom Page as a Home Page in WordPress
This is one of the most wanted hacks that users want to know how to accomplish. First you need to learn how to create a custom page. You will need to duplicate your page.php or create a brand new .php file and add the following code at the very top:
<?php /* Template Name: WPBeginnerT1 */ ?>
You can change the template name. Change any styling, that you want in that page. Go to your WordPress admin panel and create a new page and select this template.
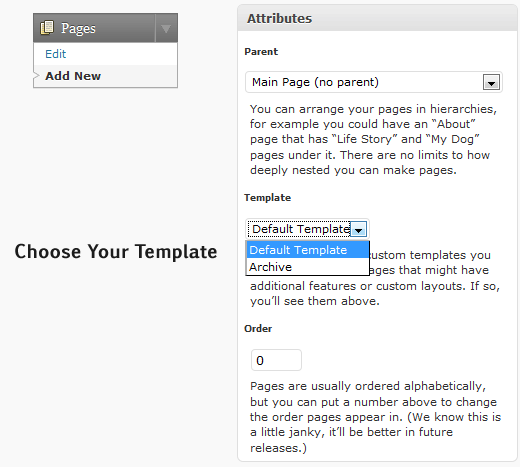
Once you have published this page go to Settings » Reading in your admin panel.
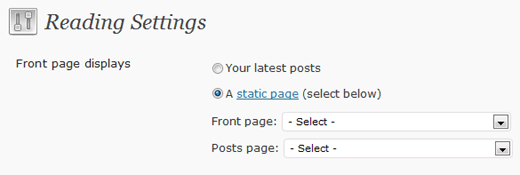 And select your page to be the homepage. Now you have yourself a Custom Home Page.
2. How to Create a Page that Displays Random Posts
Have you ever been to a site and saw this cool feature? They have a link in their top navigation to something like Stumbe! or Read Random Articles, or some other creative text. When you click on that link, it takes you to a page that displays one random page. Each time you refresh, you are delivered with a new post. Well this trick is just for you then.
You would need to follow the trick #1 in this article to create a custom page template. And simply paste this code in there:
<?php
query_posts(array('orderby' => 'rand', 'showposts' => 1));
if (have_posts()) :
while (have_posts()) : the_post(); ?>

<h1><a href="<?php the_permalink() ?>"><?php the_title(); ?></a></h1>

<?php the_content(); ?>

<?php endwhile;
endif; ?>
This is a simple WordPress Loop that is running a query to display random posts and the number 1 in there is telling WordPress to only show 1 post. You can change that number, but most of the time people do it one post a time.
3. How to Display any External RSS Feed on Your Site
Have you seen other bloggers who display their other blog’s feed on their site. You want to do it too for extra promotion and traffic. Well here is the tutorial for you. Simply paste the following code in anywhere in your theme:
<?php include_once(ABSPATH.WPINC.'/feed.php');
$rss = fetch_feed('http://feeds.feedburner.com/wpbeginner');
$maxitems = $rss->get_item_quantity(5);
$rss_items = $rss->get_items(0, $maxitems);
?>
<ul>
<?php if ($maxitems == 0) echo '<li>No items.</li>';
else
// Loop through each feed item and display each item as a hyperlink.
foreach ( $rss_items as $item ) : ?>
<li>
<a href='<?php echo $item->get_permalink(); ?>'
title='<?php echo 'Posted '.$item->get_date('j F Y | g:i a'); ?>'>
<?php echo $item->get_title(); ?></a>
</li>
<?php endforeach; ?>
</ul>
4. Link to External Links from Your Post Title
Did you see other sites link to external posts from their post title? Well that is because it is completely useless to create a new post where inside you are going to tell users to go to another site to read it. You are wasting your user’s time. This trick will allow you to link to external links from your post title in WordPress.
First open your functions.php file and add the following codes in there:
function print_post_title() {
global $post;
$thePostID = $post->ID;
$post_id = get_post($thePostID);
$title = $post_id->post_title;
$perm = get_permalink($post_id);
$post_keys = array(); $post_val = array();
$post_keys = get_post_custom_keys($thePostID);

if (!empty($post_keys)) {
foreach ($post_keys as $pkey) {
if ($pkey=='url1' || $pkey=='title_url' || $pkey=='url_title') {
$post_val = get_post_custom_values($pkey);
}
}
if (empty($post_val)) {
$link = $perm;
} else {
$link = $post_val[0];
}
} else {
$link = $perm;
}
echo '<h2><a href="'.$link.'" rel="bookmark" title="'.$title.'">'.$title.'</a></h2>';
}
These codes must be placed in php tags.
Then open your index.php and find the following code:
<h2><a href="<?php the_permalink() ?>" rel="bookmark"><?php the_title(); ?></a></h2>
And replace it with:
<?php print_post_title(); ?>
This can also be accomplished by a use of a plugin called Page Links To.
5. Display any Number of Posts in a Loop
Did you ever want to display a different number of posts on different pages. For example on your category pages, you want to display 10 posts which you can control from your Admin panel, but another page you want to show only 5 posts. Well this tutorial is just for you.
Open a Template file where you want to display an x number of recent posts:
// if everything is in place and ready, let’s start the loop

// to display ‘n’ number of posts, we need to execute the loop ‘n’ number of times
// so we define a numerical variable called ‘$count’ and set its value to zero
// with each iteration of the loop, the value of ‘$count’ will increase by one
// after the value of ‘$count’ reaches the specified number, the loop will stop
// *USER: change the ‘n’ to the number of posts that you would like to display

if ($count == "n") { break; }
else { ?>

// for CSS styling and layout purposes, we wrap the post content in a div
// we then display the entire post content via the ‘the_content()’ function
// *USER: change to ‘‘ to display post excerpts instead

// here, we continue with the limiting of the number of displayed posts
// each iteration of the loop increases the value of ‘$count’ by one
// the final two lines complete the loop and close the if statement
6. Highlight Author’s Comment
Have you ever seen this on blogs where author’s comments are distinguished from other comments? Well this is a simple and easy trick.
First you need to open your style.css in your template folder and add the following: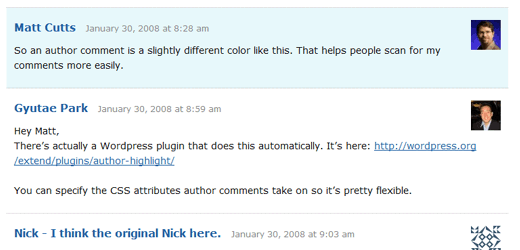
.authorstyle { background-color: #B3FFCC !important; }
Then you need to open your comments.php which is also located in your themes folder and find the code that looks some what like this:
<li <?php echo $oddcomment; ?>id="comment-<?php comment_ID() ?>"></li>
Replace it with:
<li class="<?php if ($comment->user_id == 1) $oddcomment = "authorstyle"; echo $oddcomment; ?>"></li>
Note you must change 1 to the user id of the author. Once you do this, your blog comments will have a different background for the author’s comment compared to the rest.
7. Display Twitter Follower Count as Text
There are users who absolutely hate buttons like Feedburner buttons or Twittercounter buttons. Are you one of them? Do you want to display your twitter count as text, so it blends in to your new custom design? Well then this hack is just for you.
First you would need to create a file twitter.php and paste the following code in there:
<?php
$tw = get_option("twitterfollowerscount");
if ($tw['lastcheck'] < ( mktime() – 3600 ) )
{
$xml=file_get_contents('http://twitter.com/users/show.xml?screen_name=wpbeginner');
if (preg_match('/followers_count>(.*)</',$xml,$match)!=0) {
$tw['count'] = $match[1];
}
$tw['lastcheck'] = mktime();
update_option("twitterfollowerscount",$tw);
}
echo $tw['count'];
?>
Make sure to replace wpbeginner with your twitter name.
Then Simply place this code anywhere you want to display this:
<?php include("twitter.php"); ?>
8. How set an Expiration Date for Your Posts
This hack comes becomes very useful when you are running a contest because you might be posting information such as clues or hints that you don’t want to stay up for ever. Instead of manually removing the article, you can just make it expire automatically. It also works if you have a product that you are offering a discount on. You posted it on your blog, but you don’t want that discount to stay on your blog after its over. So you can remove it automatically with this code.
All you need to do is replace your WordPress Loop with this code:
<?php
if (have_posts()) :
while (have_posts()) : the_post(); ?>
$expirationtime = get_post_custom_values('expiration');
if (is_array($expirationtime)) {
$expirestring = implode($expirationtime);
}

$secondsbetween = strtotime($expirestring)-time();
if ( $secondsbetween > 0 ) {
// For example…
the_title();
the_excerpt();
}
endwhile;
endif;
?>
Once you have done that, you can use custom fields when writing a post to set an expiration date. Make sure you select the key “expiration” and use the the following date format: mm/dd/yyyy 00:00:00
Now this hack does not remove or unpublish the article instead it just excludes the article from being displayed in the loop.
9. Delete Posts Revisions from Your Database
WordPress has a lot of good features and one of them is Post Revisions. This was included in WordPress 2.6, even though this is a good feature, it can cause some problems. One of them is increase the size of your database. Depending on how long it takes you to write a post, you might have as many as fifty post revisions. Now you can manually delete them, or you can run a simple query which we will show you in this post and get rid of all these useless revisions.
First thing you need to do is login to your phpMyAdmin and select your WordPress Database.
Click on the SQL Button and enter the following query:
DELETE FROM wp_posts WHERE post_type = "revision";
In this code basically we looked up a table wp_posts and removed every post that had a post_type revision associated with it. Now depending on the size of your database, this may save you a lot of space.
10. Custom CSS Stylesheet for Individual Posts
There are sites that use custom stylesheet for individual posts. Do you want to know how you can do it also? It is very simple. This is accomplished by the use of Custom Fields.
First you will need to open your header.php and insert this code somewhere in between <head></head> codes.
<?php if (is_single()) {
$customstyle = get_post_meta($post->ID, 'customstyle', true);
if (!empty($customstyle)) { ?>
<style type="text/css">
<?php echo $customstyle; ?>
<style>
<?php }
} ?>
Once you have done that you can add a custom field in each post with the name customstyle and add the css codes in there.
For example if you want the a certain image to have border you can add:
#coolimageclass{border: 5px solid #ccc;}
Use the format above and you now have custom CSS for your single posts.
11. Easily Add Custom Header, Footer, or Sidebar on Different Categories
Did you ever come across a site that is using different header or sidebar for some categories? Well this is how you can accomplish that as well.
To call a particular header, you will need to open your index.php and replace your normal header code with this one:
<?php if (is_category('Blogging')) {
get_header('blogging');
} else {
get_header();
} ?>
This code above is basically telling WordPress that if someone opens the category called “Blogging” then WordPress needs to display a file called header-blogging.php if it exist. If it does not exist, or if the category is not blogging, then WordPress displays the default header file.
To get a separate sidebar for each all you need to do is add the following code:
<?php if (is_category('Blogging')) {
get_sidebar('blogging');
} else {
get_sidebar();
} ?>
The code above will look for sidebar-blogging.php to replace the default footer file if the category is Blogging.
To get a separate footer for each category all you need to do is add the following code:
<?php if (is_category('Blogging')) {
get_footer('blogging');
} else {
get_footer();
} ?>
The code above will look for footer-blogging.php to replace the default footer file if the category is Blogging.
12. Disable HTML in WordPress Comments
Did you ever see in your SPAM folder, how many comments have tons of HTML codes which is basically links. That is how most spammers add links. But you can disable HTML in WordPress Comments to be functional. So if someone uses the strong code, it will not bold the text etc.
All you have to do is simply open your functions.php and add the following code:
// This will occur when the comment is posted
function plc_comment_post( $incoming_comment ) {

// convert everything in a comment to display literally
$incoming_comment['comment_content'] = htmlspecialchars($incoming_comment['comment_content']);

// the one exception is single quotes, which cannot be #039; because WordPress marks it as spam
$incoming_comment['comment_content'] = str_replace( "'", ''', $incoming_comment['comment_content'] );

return( $incoming_comment );
}

// This will occur before a comment is displayed
function plc_comment_display( $comment_to_display ) {

// Put the single quotes back in
$comment_to_display = str_replace( ''', "'", $comment_to_display );

return $comment_to_display;
Source – The original author also offers a plugin that you can download from his site.
13. Display Latest Sticky Posts in WordPress
Assuming that you have already created a custom page template and/or already have The Loop ready, paste the following code before the loop.
<?php
/* Get all sticky posts */
$sticky = get_option( 'sticky_posts' );

/* Sort the stickies with the newest ones at the top */
rsort( $sticky );

/* Get the 5 newest stickies (change 5 for a different number) */
$sticky = array_slice( $sticky, 0, 5 );

/* Query sticky posts */
query_posts( array( 'post__in' => $sticky, 'caller_get_posts' => 1 ) );
?>
This code can very well be used in featured slider, or any other advanced feature that you would like to display on your site. This snippet is mostly geared toward a WordPress site that has a custom homepage or a magazine style look.
The credit to this code goes to Justin Tadlock and partially to Nathan Rice for coming up with the array slice solution.
14. Display Categories in a Drop Down Menu
Some blogs have a lot of categories which they can’t display in their sidebar. Or some bloggers do not want to take up a lot of space displaying categories. This option allows them to have a select menu, dropdown menu, for categories. See WordPress Codex for details.
<form action="<?php bloginfo('url'); ?>/" method="get">
<?php
$select = wp_dropdown_categories('show_option_none=Select Category&show_count=1&orderby=name&echo=0&selected=6');
$select = preg_replace("#<select([^>]*)>#", "<select$1 onchange='return this.form.submit()'>", $select);
echo $select;
?>
<noscript><input type="submit" value="View" /></noscript>
</form>
15. Display the most Recent Post from a Specific Category
Did you see sites with a magazine style theme who are displaying posts from a specific category. Sometimes only the most recent post. Well you can do this too easily.
<?php
query_posts('showposts=1&cat=3');
while(have_posts()) : the_post();
?>
<ul>
<li><h3><a href="<?php the_permalink() ?>" rel="bookmark"><?php the_title(); ?></a></h3>

<ul><li><?php the_content(); ?></li>
</ul>
</li>
</ul>
<?php endwhile; ?>
Add the above code anywhere you like in the template. Make sure you change the category ID and you can change the number of posts displayed as well if you want.
16. Modify Excerpt Length and More Tags
WordPress lets you display Excerpts, but up until version 2.9 you could not control the excerpt length. With the following code, you can increase the length from default 55 words to as many words as you like. Open your functions.php file and add the follwowing codes in there:
// Changing excerpt length
function new_excerpt_length($length) {
return 100;
}
add_filter('excerpt_length', 'new_excerpt_length');

// Changing excerpt more
function new_excerpt_more($more) {
return '…';
}
add_filter('excerpt_more', 'new_excerpt_more');
Change the 100 word limit to the count that you desire.
17. Display Author’s Twitter and Facebook Information on their Profile Page
WordPress has fields for fields for author contacts, but it has not been updated in ages. So by default you do not have an ability to add author’s twitter or facebook. With this hack you can add this information on their profile page.
First open your functions.php and paste the following code:
<?php
function my_new_contactmethods( $contactmethods ) {
// Add Twitter
$contactmethods['twitter'] = 'Twitter';
//add Facebook
$contactmethods['facebook'] = 'Facebook';

return $contactmethods;
}
add_filter('user_contactmethods','my_new_contactmethods',10,1);
?>
The above code will add two extra fields on your user-edit page named twitter and Facebook. You can display the code with the following code in your author.php file.
<?php echo $curauth->twitter; ?>
Source: Joost De Valk
18. Display Most Recent Comments with Gravatars
Have you seen sites that display most recent comments in their sidebar with user gravatars. Well this can be done easily with these codes. Simply paste the following code anywhere you want to display the most recent comments.
<?php
$query = "SELECT * from $wpdb->comments WHERE comment_approved= '1'
ORDER BY comment_date DESC LIMIT 0 ,5";
$comments = $wpdb->get_results($query);

if ($comments) {
echo '<ul>';
foreach ($comments as $comment) {
$url = '<a href="'. get_permalink($comment->comment_post_ID).'#comment-'.$comment->comment_ID .'" title="'.$comment->comment_author .' | '.get_the_title($comment->comment_post_ID).'">';
echo '<li>';
echo '<div class="img">';
echo $url;
echo get_avatar( $comment->comment_author_email, $img_w);
echo '</a></div>';

echo '<div class="txt">Par: ';
echo $url;
echo $comment->comment_author;
echo '</a></div>';
echo '</li>';
}
echo '</ul>';
}
?>
To get more or less than 5 comments, change the number 5 on line 2.
Source: WPRecipes
19. Display Most Recent Tweet in WordPress
Twitter is getting very famous among bloggers. Many bloggers are now displaying their most recent tweet on their blog. If you want to display your most recent tweet on your blog simply place this code where you want to display it in your WordPress theme.
<?php
$username = "TwitterUsername"; // Your twitter username.
$prefix = ""; // Prefix – some text you want displayed before your latest tweet.
$suffix = ""; // Suffix – some text you want display after your latest tweet.
$feed = "http://search.twitter.com/search.atom?q=from:" . $username . "&rpp=1";
function parse_feed($feed) {
$stepOne = explode("<content type=\"html\">", $feed);
$stepTwo = explode("</content>", $stepOne[1]);
$tweet = $stepTwo[0];
$tweet = str_replace("<", "<", $tweet);
$tweet = str_replace(">", ">", $tweet);
return $tweet;
}
$twitterFeed = file_get_contents($feed);
echo stripslashes($prefix) . parse_feed($twitterFeed) . stripslashes($suffix);
?>
Make sure to change the username in the first line.
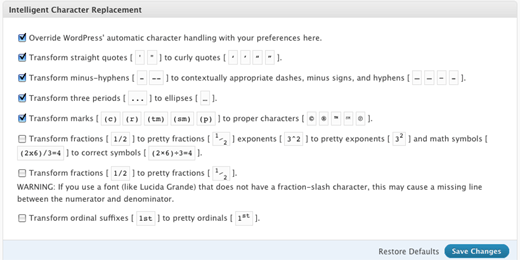
20. Improve Typography in WordPress
Have you ever wished that you can have rounded quotes, show elipses, your hyphens don’t get mixed up, well this is your lucky day because it can be done with a plugin called WP-Typography.